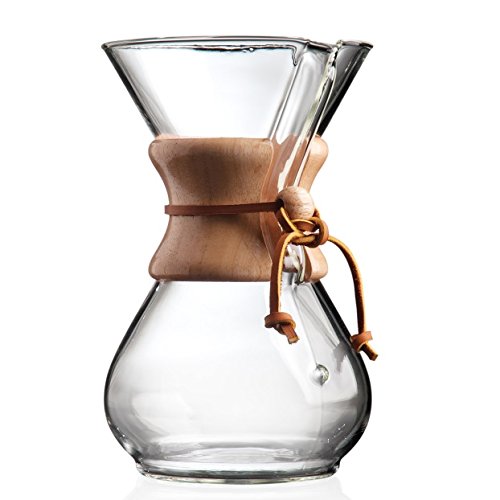
Popular since its invention in 1941, this quirky pour-over device uses the process of heat combined with slow saturation of the grounds to extract the bold, robust flavor from your coffee beans.
The thick filters that Chemex requires also ensure the absence of sediment leftover in your coffee, a common flaw of other brewing methods like the French Press.
Consisting of just one piece of handblown glass, Chemex tends to attract coffee lovers simply because of how beautiful it looks and how appealing your coffee presents once brewed. However, Chemex does not just look. This truly unique piece allows for so many variations in brewing, making every single element of the brewing process matter.

Knowing Your Chemex and Setup
From your choice of coffee beans, the grind size you choose, and the style of kettle you use, all the way to how you measure or weigh your coffee and water – every step of the brewing process adds or takes away from your finished cup of coffee when using a Chemex.
But don’t worry, using, and even mastering, the art of the Chemex, really isn’t that hard. It’s actually incredibly fun to play around with and hard to mess up. We will break down each element and its importance, and before you know it, you’ll be able to produce your perfect cup of coffee with each brew.
What You Need
- Chemex Brewer
- Chemex pre-folded paper filters
- Freshly roasted coffee beans of your choosing
- Hand Burr Grinder or Automatic Grinder
- Scale for coffee measuring(or tablespoon)
- Electric Gooseneck Kettle or Stovetop Kettle
- Mugs or Tumblers (I recommend a YETI Tumbler)
1. Chemex Setup
To get started, you’ll need to have your Chemex setup and ready to go. Whether you’re using the Classic Chemex or the Handblown Chemex, this easy-to-use brewing method has three parts – the glass carafe and the wooden collar, held together with a leather cord.
To assemble the coffee maker, simply line up the wooden collar around the neck of your Chemex and tie the cord securely around it to hold it in place. Next, you’ll need to set up and rinse the filter.
2. Filter Prep
Chemex paper coffee filters are essentially a large square, or circle, folded into fours. To use one, you’ll want to open the paper filter from one corner, making a triangular “bowl” with a single layer of paper on one side of the bowl and three layers on the opposite side.
Place it in the brewer, putting the crease of the fold perpendicular with the spout of the Chemex coffee maker, and making sure the three-layer side is on the spout side.
For a more detailed explanation of all things filter related, check out our Chemex Filter guide here.
Using warm or hot water from your kettle, pour ½ – 1 cup of water to thoroughly rinse the filter, making sure to get the entire filter wet and dumping the excess water out. By pouring water through the filter, you eliminate any papery taste from altering your coffee while pre-heating the Chemex so it’s already warm when you begin to brew.
Tip: Watch out for airflow! Because of its design, the Chemex’s only airflow to the bottom portion is through the spout. Your filter may suction into the spout, leaving no room for air. This will seal off the bottom where your coffee is brewed into. Once your filter is wet, and before adding the grinds, be sure to check that this has not happened, and adjust if it has. Keep an eye out during the brewing process.
If suction occurs, you will notice the water cannot move through the grinds and filter and will instead stay in the upper brewing area of your Chemex. If this is a continual problem, you may want to place a finished wood or steel chopstick in your brewer, positioning it in the bottom portion of your Chemex so it sticks up into the spout to create that necessary opening.
3. Picking Your Beans
The thing I enjoy most about pour-over brewing, especially in the Chemex, is you get the best access to your beans’ taste portfolio. Because the Chemex takes a little longer than other pour-over methods, your grinds get very saturated, allowing for a longer extraction period.
This means that every last drop of flavor will be pulled from your beans – the nutty, the fruity, the sweet, the sour – it’s all there! When trying a new roast, I always try it out on my Chemex first. I want to really taste every aspect of this roast, and Chemex will ensure I do.
Because of this, it’s generally recommended that you stick with medium or light roasts. They tend to be the mildest and most consistent. I also highly recommend finding a local roaster to get your beans from and buying them in small quantities.
Your local roastery can give you the details of how they roast and their bean origins. They also usually have more accurate and detailed tasting notes compared to big-name brands you’d find in a grocery store.
4. Knowing Your Chemex Ratio
The most common coffee-to-water ratio for Chemex brewing is 1:15. (If you’re unfamiliar with coffee ratios, check out our coffee calculator here for an in-depth explanation). But in essence, for every gram of coffee, you’ll need 15 grams of water. This is easy enough to weigh if you have a kitchen scale, but if you don’t then use 3 level tablespoons of grinds for every cup (8 ounces) of water.
If you want to make one cup of coffee, that’s 237 grams of water, meaning you’ll need 15.8 grams of coffee (3 level tablespoons).
For two cups of water (474 grams), you’ll need 32 grams of beans (10.5 tablespoons).
For eight cups of water (1,896 grams), you’ll need 126.5 grams of grinds (24 tablespoons/1.5 cups).
For ten cups of water (2,370 grams), you’ll need 158 grams of grinds (52.5 tablespoons/3.2 cups).
I use a kitchen scale at home and use 30 grams of ground coffee and 450 grams of water to get a perfectly balanced cup of coffee. Of course, if you desire your coffee to be a bit stronger, you can either increase your grams of coffee used or just lessen the amount of water used in your pour.
Now that you know your measurements, let’s prep the water.
5. Prepping the Water
With your desired ratio in mind, add the amount of water needed to your kettle, keeping in mind you’ll need slightly more to account for evaporation during boiling. For example, I will add 500 grams of water to my kettle, knowing I need only 450 grams to brew.
Heat your water to 205 degrees F (96 C), or simply bring it to a rolling boil, remove it, and let it sit for 30-60 seconds before using. Water temperature plays a big role in the extraction process and will affect the boldness and richness of your coffee, so this is not the time to be impatient and use half-heated water.
Tip: For the tastiest results, use a gooseneck kettle if possible. These allow you to have maximum control of the speed and distribution of your water.
Some coffee elitists will say a gooseneck kettle is a necessity for a Chemex, but it’s simply not true. Any type of kettle or boiler will work. What matters most is water temperature and even water distribution, which can be done successfully with any kettle type. However, a gooseneck kettle does make this much easier to accomplish, and honestly, they’re just a pretty kitchen appliance.
You can check out some of our favorite kettles here.
6. Measure & Grind the Beans
Prepare your beans as your water heats up.
Grind size and bean freshness are key to getting quality coffee, so I always recommend buying your beans whole and having an at-home grinder (you can find our best grinder recommendation for pour-over styles here). But whether you bought them ground or not, it’s important to keep in mind how big those grinds are. I recommend using a medium grind, which has about the same coarseness as sand.
Beans can be ground either really fine, almost powdery (which is really good for espresso), or really coarsely. Chemex brewing times normally range from 4-6 minutes depending on how much you’re brewing at once and how big it is.
However, if you notice that your water may be pouring through the grounds too quickly, try grinding your coffee a little finer. This will prevent under-extraction, which makes your coffee taste weak.
Likewise, if you think the water is pouring too slowly and is struggling to push through the grounds, try grinding more on the coarse side (although check that filter suction first – remember, you may have just cut off your airflow!) This will prevent over-extraction and keep your coffee from losing its flavor tasting too bitter.
Using 14-17 grams of coffee per cup (wiggle room here for personal taste preference), grind your beans in (we really recommend this) a burr grinder. These grinders are ideal because they’re manually operated, but they also grind the grounds to a uniform size.
The Chemex Brew
It may feel like a lot of set up at first, but once you’ve done it a few times, your Chemex coffee brewing will become a ritual that is a very therapeutic and simple way to start your day. Your filter has been rinsed, your Chemex is warmed and ready, your beans are ground and your water is boiling. Now what?
There are two basic steps to brewing – the bloom and the pour-over.
Step One: Bloom The Coffee
Start by adding your grinds to your filter and giving it a gentle shake to level it. I like to set my Chemex up on my kitchen scale to double-check the weight of the grinds (I use 30 grams of coffee to get a 16-ish ounce cup of coffee), and then tare that out to measure my water.
When the water is ready, pour just enough water in a circular pattern to saturate the coffee bed. I add about 60-70 grams (2-2.5 ounces) of water.
Let it sit and “bloom” for 30 seconds, allowing bubbles of carbon dioxide to gas off.
Blooming occurs when carbon dioxide gas is released from the coffee grounds as they come in contact with the hot water. The coffee will rise and create bubbles as the gasses release, making the coffee look like it’s blooming. This coffee bloom will allow your beans to have a much sweeter extraction and not be so acidic.
Step Two: The Pour-Over
Once the bloom is complete, slowly pour the water over the coffee in either a side-to-side or circular motion. If you’re making more than one serving size it’s best to do this in intervals so the water can better saturate the grounds evenly and the flavor is extracted as much as possible. You should always keep your water level a half inch below the brim of your Chemex.
When I brew my morning mug, I can usually fit roughly 350 grams of water in. Once that has gone down about halfway, I add the remaining 100 grams.
As mentioned before, using a gooseneck kettle is ideal for brewing the perfect Chemex brew, but it’s not a necessity! I was using a pot on my stovetop before I invested in a kettle and used a ladle to distribute the water. However, this will result in a more uneven pour which will affect your grind saturation. In this case, lightly stirring the grounds when mixed with water is optional to better saturate the grounds.
Once the coffee is fully filtered, toss the grounds in the trash and enjoy. If you like your coffee hotter, the Chemex can be heated on a glass or gas burner, but never on an electric coil burner.
Cold Brew: Chemex Style
Of course, a Chemex can produce more than just an excellent pour-over cup of coffee. If you’re strictly an iced coffee person or if you want to enjoy a cold cup of coffee when the temperatures get too high, you can make some banging cold brew blend in your Chemex.
What’s the difference between cold brew coffee and iced coffee? Generally speaking, iced coffee is coffee that is brewed in a traditional style (either drip or pour-over) and then chilled. You can do this in your Chemex by simply putting it in the fridge to chill once you’ve brewed your coffee.
On the other hand, cold brew is an immersion method of brewing coffee and it usually is much stronger than iced coffee and has a bolder, stronger taste than iced coffee. Simply put, you let your grinds soak overnight in water, then filter the beans out for an intense cold brew extraction.
What You Need
- Chemex Brewer
- Chemex pre-folded paper filters
- Freshly roasted coffee beans of your choosing
- Hand Burr Grinder or Automatic Grinder
- Scale for coffee measuring(or tablespoon)
- Conical pour-over dripper (another Chemex, V60. or Melitta cone)
Tip: You can prepare the cold brew right in your Chemex, or in another pitcher/container, and use your Chemex for straining if you don’t have another pour-over dripper.
Cold Brew Ratio for Chemex
Because cold brew is traditionally much stronger than iced coffee, the ratio is much smaller. For a bold cold brew, go with a 1:10 bean-to-water ratio. If you like adding milk to your cold brew, we suggest making a more concentrated cold brew, using a 1:8 bean-to-water ratio. Below is a chart with these two ratios broken down for serving sizes.
| Water | 1:10 Ratio - Grinds | 1:8 Ratio - Grinds |
|---|---|---|
| 1 cup | 24 grams/4.5 tablespoons | 29.5 grams/6 tablespoons |
| 2 cups | 48 grams/9.5 tablespoons | 59 grams/12 tablespoons |
| 4 cups | 96 grams/19 tablespoons/1.25 cups | 118.5 grams/23.5 tablespoons/1.5 cups |
| 8 cups | 192 grams/38.4 tablespoons/2.5 cups | 237 grams/47.5 tablespoons/3 cups |
(Tip: remember, a cup of water weighs 237 grams)
Brewing Cold Brew
Once you know how much you are making and have picked your ratio, go ahead and weigh out your beans. You’ll want to stick with a similar or the same grind size as a hot brew – medium to medium coarse. You don’t want your grinds to be too fine or you may struggle to filter them out later. But you also don’t want your grinds to be too coarse, or your cold brew will come out weaker tasting.
Tip: Because cold brew does not bring out the distinctive taste of each blend the same way a pour-over brew does, this is a great way to mix beans up. All those end-of-bag beans that don’t quite weigh out for a pour-over? Toss ‘em all in and make a delicious blended “mystery” cold brew!
Place your grinds in the bottom of the Chemex brewer. Then add your water. Swirl until the beans are evenly wet through. Cover your Chemex top with plastic wrap and put it in the fridge for 20-24 hours. If you keep it in longer, no worries. The beans will be fully extracted after 24 hours so the coffee will not continue to be bitter.
Filtering Your Cold Brew
Once your cold brew has sat overnight, place your filter in your pour-over dripper. Slowly pour your cold brew, filtering out the grinds. Most of them will stay in the bottom of your Chemex, but the filter will catch any excess grinds.
After filtering, empty the used grinds into your trash, wash your Chemex out and enjoy a fresh glass of cold brew! We highly recommend adding some cold foam to make this delicious drink into a sweet treat!
Enjoying Your Chemex All Year Round
Whether you brew hot coffee each morning or utilize your Chemex for cold brew, you have endless possibilities for making a quality coffee drink with your Chemex brewer.
You can play around with and tweak your brewing method in so many ways, be it grind-to-water ratio, the type of beans and roast you choose, or the timing and precision of water distribution. There are so many fun ways to mix it up with a Chemex and each one will result in a beautiful and tasteful cup of coffee.
Happy Caffeinating!


