Coffee to Water Calculator
Here’s a quick calculator we created to make the process really simple. All you have to do is pick the following: your brewer of choice, how much coffee you want, and how strong you want it.
We’ve created brew strength presets for every method that will provide a good starting point. If you want to skip our recommendations and play around with your own ratios, you can do that as well.
One last step — tell our calculator your favored way to measure coffee and water. The result? A brew recipe that’s tailor-fit to your preferences!
Set your preferred brew strength by choosing from the preset ratios below, or create a custom ratio.
CALCULATING


Ah, the venerable French press. For many years, this method was the most popular way to brew coffee by hand, at least until pour-over made its successful comeback alongside the rise of specialty cafés.
Still, this full-immersion brewer remains a popular fixture in many homes because of its versatility, cheap acquisition cost, and uncomplicated brewing process. But that doesn’t mean you can just throw coffee and water together, push the plunger, and call it a day.
So, how do we achieve the rich and flavorful cup that a French press is known for? For about ten years, I’ve followed the same two-step process for every new brewer we test at my coffee shop.
First, figure out a coffee-to-water ratio that works for you. This guide features a handy calculator that will create a French press recipe based on your preferences — no complicated ratio knowledge is required!
The second step: Execute that recipe with as much precision and consistency as your equipment can muster. We’ve got you covered here, too — from better tablespoon approximations to our easy-to-use French press brewing guide.
Let’s take the plunge!
The Coffee-to-Water Ratio Calculator
INSERT LINK TO RATIO CALCULATOR HERE
It’s simple, and you don’t need to be familiar with brew ratios. Tell it your preferences, and you’ll get a recipe to try out! Here are the questions you should consider when using the calculator.
- How Much Coffee Do You Want To Make?
- How Intense Do You Like It?
- How Do You Measure Coffee?
How Much Coffee Do You Want to Make?
Confusing Cup Sizes
You might have noticed that the calculator asks how many cups of coffee you want to make. But how much liquid goes into a cup? And how many “cups” can your French press hold? Stay with me, and I promise you that we’ll make it make sense.
Let’s get this out of the way: There is no such thing as a “standard cup.” If you ask anyone in the United States, a cup is eight(8) fluid ounces. Cups in Canada are 7.6 ounces, and in Japan, they’re exactly 200 milliliters, about 6.7 ounces.
Coffee equipment companies add to the confusion by using cups to describe a brewer’s capacity. For instance, Bodum lists the largest size of its iconic Chambord French Press (which we’ve reviewed here) as a 12-cup brewer with a 51-ounce capacity. That’s just a little over 4 ounces per cup. Tiny!
How now, then? For our calculator, we’ve decided to use a cup definition that plays nice with coffee recipes. The Specialty Coffee Association (SCA) standard cup of coffee is defined as six fluid ounces of water before brewing. This translates to about 5.33 ounces of brewed coffee.
How Intense Do You Like It?
Figuring Out French Press Cup Capacity
To determine how many cups you should choose on the calculator for your French press, divide its capacity in fluid ounces by six and round down. This ensures enough space in the press for the water and ground coffee beans, as well as the inch or so that the plunger assembly occupies when you put it on.
For example, let’s say your French press is a 4-cup model that holds 17 ounces (that’s 500 milliliters for the metric-minded). Dividing 17 by 6 gives us 2.83. After rounding down, we get our answer: Two cups!
Depending on how strong you want it, you will need four to six tablespoons (or 20 to 30 grams) of ground coffee for a two-cup brew. It should all fit nicely inside a 500-milliliter press with the plunger on top.
Brew Strength and Ratios
We’ve greatly simplified how to adjust your French press brew to your liking by letting you choose between Mild, Regular-strength, and Strong in our calculator. These are based on three different coffee-to-water ratios, each affecting the brew differently.
The ratios here are based on industry standards, common café practices, and our experiments. These aren’t magic recipes that will make every French press taste great, but they offer a range that might work for most people.
You don’t have to stick to our prescribed ratios either, especially if you use a coffee scale to make coffee (much, much easier to dial in ratios, believe me!). But you know what they say: Learn the rules so you can break them!
How Do You Measure Coffee?
The Golden Cup Standard
The National Coffee Association defines this standard as two tablespoons of ground coffee for every six fluid ounces of brewing water. This is derived from the Coffee Brewing Control Chart, where a balanced cup of coffee has a ratio of 55 grams of coffee per liter of brewing water (55g/L). Simplified even further, we get 1:18.
If you’ve never used a scale to brew coffee, it might be hard to grasp the numbers above. But let’s bring clarify the process through some good ol’ volume-to-weight conversions!
A tablespoon of coffee is accepted to weigh about five grams. One fluid ounce is thirty grams. So if we convert the Golden Cup Standard to metric, we get this: 10 grams of coffee for every 180 grams (or milliliters) of water. According to decades of study, this offers the optimum balance of flavor.
But does it, really?
Brew Strengths
A Mild French Press
We went ahead with 1:18 for our coffee-to-water ratio for a mild French press. There’s a reason that the Golden Cup Standard exists; to maximize flavor extraction. More water means more brewing happening.
The Specialty Coffee Association (SCA) lists this ratio on its Protocols and Best Practices page for French press brewing and coffee cupping. Cupping, the industry-standard method of evaluating coffee, is a full-immersion technique like the press minus the plunging and straining part.
However, with this ratio, we get more dilution. The result is a cup that extracts all the flavors of the bean, expressed delicately. If that sounds appealing, then this ratio is the right one for you.
A Strong French Press
For pour-overs, 1:15 might be considered on the strong side. But a quick search online for the ideal French press recipe shows 1:12 repeated often. Even cafés and coffee professionals swear by it.
But why does a French press need so much more coffee? Because full-immersion brews are simply less efficient at extracting flavors from coffee than pour-overs! And the difference lies in the way water acts during the brewing process.
With a pour-over, flavor extracts at a high rate throughout the brew. Clean water pulls solubles from coffee very efficiently. And the process of pouring allows us to constantly replenish water up top as the brewed coffee drips out below.
In full-immersion brewing, all ground coffee is in contact with water at once. Flavor extracts at a high rate initially but slows considerably as the brew takes shape. Over time, the water steadily becomes saturated with coffee solubles, making it less efficient at extracting the oils on the grounds.
To counteract this slower extraction, we can use more coffee to boost the brew’s flavor — hence, 1:12. The result is a rich and tasty cup with an almost creamy mouthfeel. If that’s your idea of a perfect cup, or you enjoy putting milk in your brew, then stick to this ratio.
A Regular-Strength French Press
Our regular-strength coffee-to-water ratio is 1:15. While this might be on the strong side for a pour-over, that’s not the case for the French press and its extraction rate.
This ratio has seen a lot of action at my café. It’s a safe pick for what most likely will be a decent cup that you can further tweak to your liking. Even when it isn’t great, it’s probably close enough that you’ll know what to fix.
I call this the goldilocks zone for French press, where you get better flavor extraction and a small boost in strength to keep things from being too delicate. Choose this ratio if that sounds good to you or if you’re brewing a coffee for the first time.
Testing Tricky Tablespoons
The sheer simplicity of a French press means everyone can pull off a good brew. But this is hard to do consistently if you measure coffee by volume instead of weight. If you want truly repeatable precision, nothing beats brewing with a digital scale (and you can check out our picks here!).
But part of the allure of the French press is its low acquisition cost. The brewers are mostly affordable, and you don’t necessarily have to use gooseneck kettles and coffee servers — both considered essential pour-over equipment. It’s also likely that many users of the press use tablespoons instead of scales.
No worries, let’s work on making those spoons work better for you! The most popular weight online conversion for one tablespoon of coffee is five grams. Using it for our calculator made sense, especially after we repeatedly hit the same figure in our tests.
However, this does not always happen, and we’ve compiled our tests and observations below. Hopefully, our test results will give you an idea of how to take better measurements the next time you brew.
My Testing Method
I’ve picked three coffees to test for this exercise. A dark-roasted Panama Boquete, a medium-roasted Costa Rica Tarrazu, and a light-roasted Philippines Liberica.
Heaping tablespoons were used in every test to simulate real-world scooping conditions. Tablespoons are the most popular volumetric tool for coffee, and if you’re like me, my spoons are never not heaping!
The weight of each scoop was measured by emptying the coffee into a container on top of a calibrated digital scale with 0.1-gram accuracy. Each test was performed on each sample three times, with the average noted as the result.
Test 1. Scooping Whole Bean vs. Ground Coffee
Is it more accurate to measure out whole-bean coffee or ground coffee with a tablespoon?
That’s what I wanted to figure out with this first test. I thought that the variety in the shapes and sizes of whole bean coffee would give weight readings that don’t match up with their ground counterparts. This can be especially problematic if you only have access to pre-ground coffee.

These results came as a surprise! A heaping tablespoon of whole-bean coffee shows weight readings almost identical to their ground-up counterparts.
Take the Dark Roast Panama coffee, for instance: The average weight of a whole bean tablespoon was 5.3 grams. Ground for the French press, the average weight was 5.1 grams.
With this discovery, we can be more flexible when following a French press recipe. You can use a tablespoon to measure out whole-bean coffee so that you only grind what you need. If you’re limited to pre-ground coffee, then you can simply do the same.
Test 2. Dark vs. Medium vs Light Roast
I’ve spent time working at our roastery, and these results are consistent with what we’ve experienced.
Dark-roasted coffees weigh less than their medium and light-roasted counterparts. Longer exposure to heat during the roasting process evaporates more of the coffee’s moisture and ejects more of its silverskin. The darker you go, the lighter the beans get.
Let’s compare the heaping tablespoon weights of three coffees roasted differently using the coarse ground samples from Test 1.
| Coffee (ground for french press) | Weight |
|---|---|
| Dark Roast Panama | 5.1g |
| Medium Roast Costa Rica | 6.2g |
| Light Roast Philippines | 7.0g |
So it seems five grams is a legitimate weight only if your beans are dark-roasted. But a light roast in the spoon weighed as high as 7.4 grams in our tests! That’s too much of a difference; you’d be using way more coffee with every tablespoon, greatly affecting your coffee-to-water ratio.
We’ve come up with the following adjustments you can make if your coffee isn’t a dark roast.
- Medium Roast: Use 1/5 less coffee. If the recipe calls for five tablespoons, use four instead
- Light Roast: Use 1/3 less coffee. If the recipe calls for three tablespoons, use two instead
It’s a bit of math, but it’s worth doing if you want to follow a specific brew recipe.
Test 3. Grind Size Differences
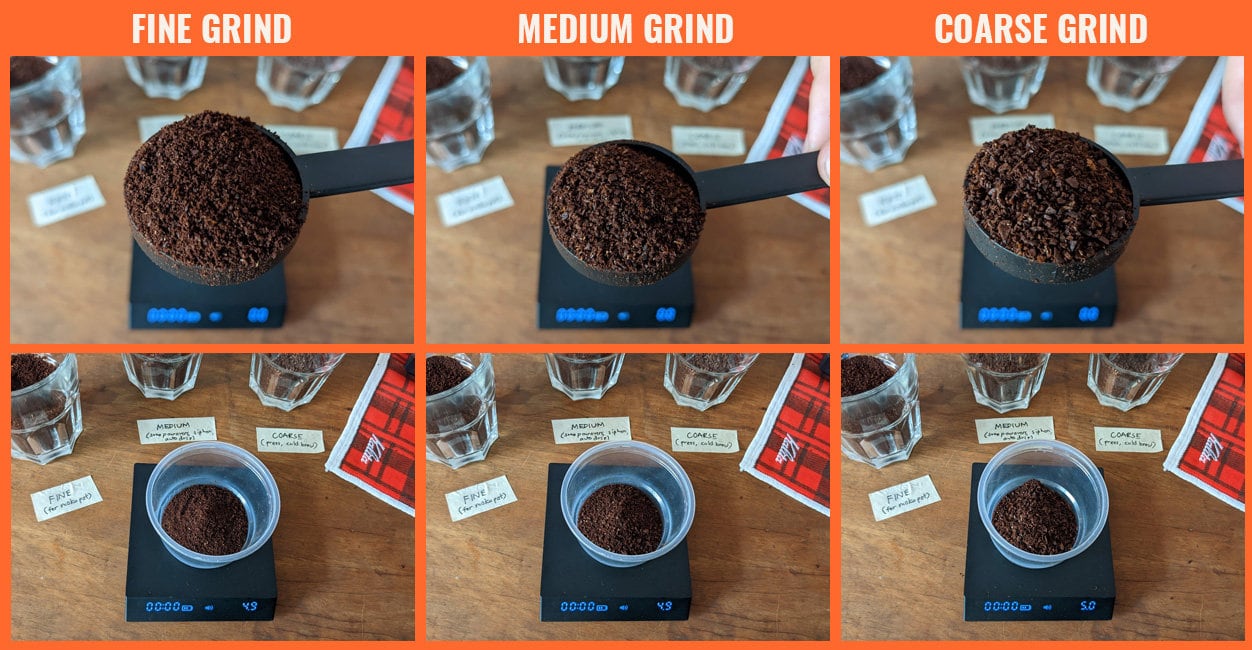
The consensus seems to dictate a coarse grind for French press. But there are varying opinions of what coarse is, and grinders are all different. We’ve decided to show you ours, just so we’re on the same page.
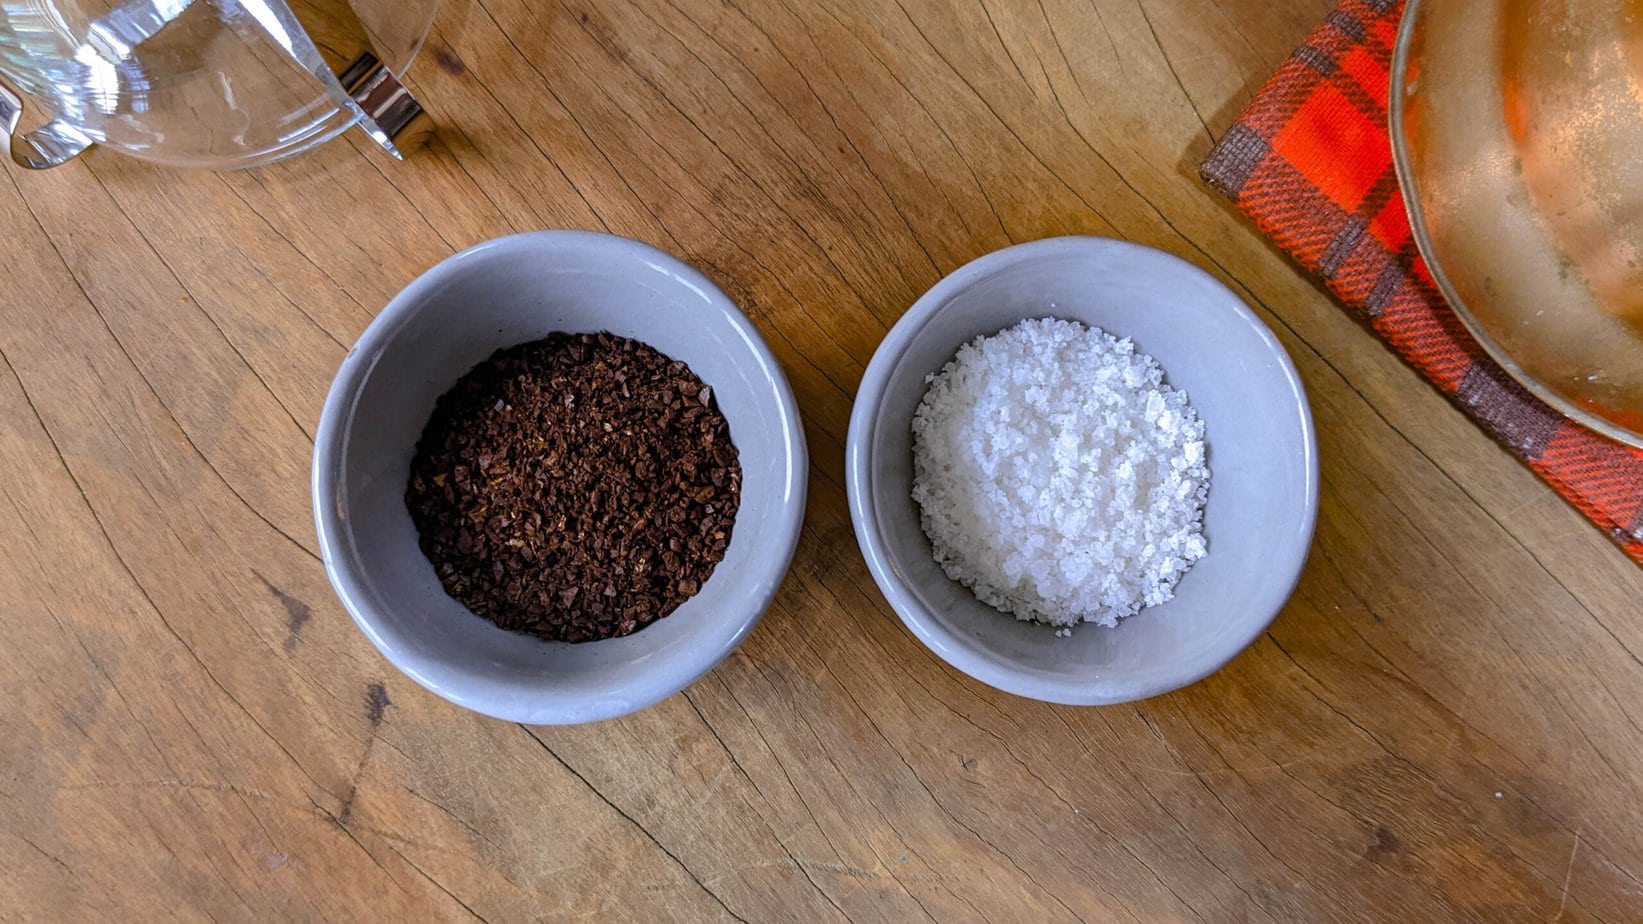
The coarsest we’re willing to go for French press brewing might be smaller than you’d expect. It’s the same grind size we’ve recommended in this gem from Roasty’s early days.
Say you try another recipe that tells you differently. How will variations in grind settings affect our tablespoon accuracy?
It won’t matter much, apparently. Tablespoons are safe! Comparing our coarse grind to Moka pot fine shows practically identical weights. Our dark roast Panama Boquete measurements all hit close to five grams for each tablespoon despite differences in grind size.
Easy French Press Coffee
At Roasty Coffee, we care about being precise in our brews. But that doesn’t mean we all enjoy complicated brewing routines!
This French press recipe is simple; just a handful of steps and a lot of unattended time. But it’ll give you a great cup with minimum effort.

What You Need
- French Press (17 ounces or 500 milliliters)
- Whole bean coffee
- Coffee grinder (preferably, a burr grinder)
- Hot water kettle (I used my favorite stovetop gooseneck)
- Digital scale (or tablespoons and measuring cups)
- Something to stir with, like a chopstick
- Timer
- Serving vessel or mug
Decide On Your Recipe
For our example, I’ll use the calculator to select the following:
- I want to make two cups
- I want my coffee Regular-strength
- I use grams to measure my coffee
My coffee-to-water ratio will be as follows:
- 24 grams coffee
- 360 grams water
Prepare Your Water
The first step in any brewing method is to heat water in the kettle. It takes a few minutes, which is enough time for you to prepare your brewing station and grind the coffee.
You’ll generally get good results if your water falls within the temperature range of 195-205°F (90-96°C). If you’re splurging on coffee gear, a variable-temperature electric kettle is a great buy that simplifies things. I’ve been forever spoiled by precise temperature control and a keep-warm feature.
If you don’t have a way to measure this, just use ‘off-the-boil’ water. Simply let your water boil, then shut the kettle off. Many smaller recipes suggest waiting 30 seconds to one minute, but it will take longer for full kettles.
To do a little test before we brew, I traded my smart kettle for my trusty ol’ stovetop gooseneck. I put one liter of water in a closed kettle and let it boil on the stovetop. I shut it off and started a timer.

Result: It took close to two minutes for the water to reach 205°F (96°C) from boiling.
Back to our recipe. It might be easier to fill the kettle up if you’re using a scale! In addition to the 360 grams of water our recipe needs, more is needed to preheat our equipment.
If you are using measuring cups, fill the kettle only with what you need. Our sample recipe uses 360 grams (or milliliters) of water, so fill your kettle with the equivalent of one and a half US cups. You will also need additional hot water to preheat your equipment.
Preheat the Press
Add hot water to your French press and the serving vessel and discard the water just before using them. This step keeps things properly toasty during the brew, and your coffee stays hotter longer. Two great reasons why you shouldn’t skip this step!
Prepare Your Coffee
Our recipe for two cups calls for 24 grams of coffee, equivalent to 4.8 tablespoons. Use a coarse grind with the consistency of kosher salt. For the tastiest cups, grind only right before you brew.

Begin Brewing
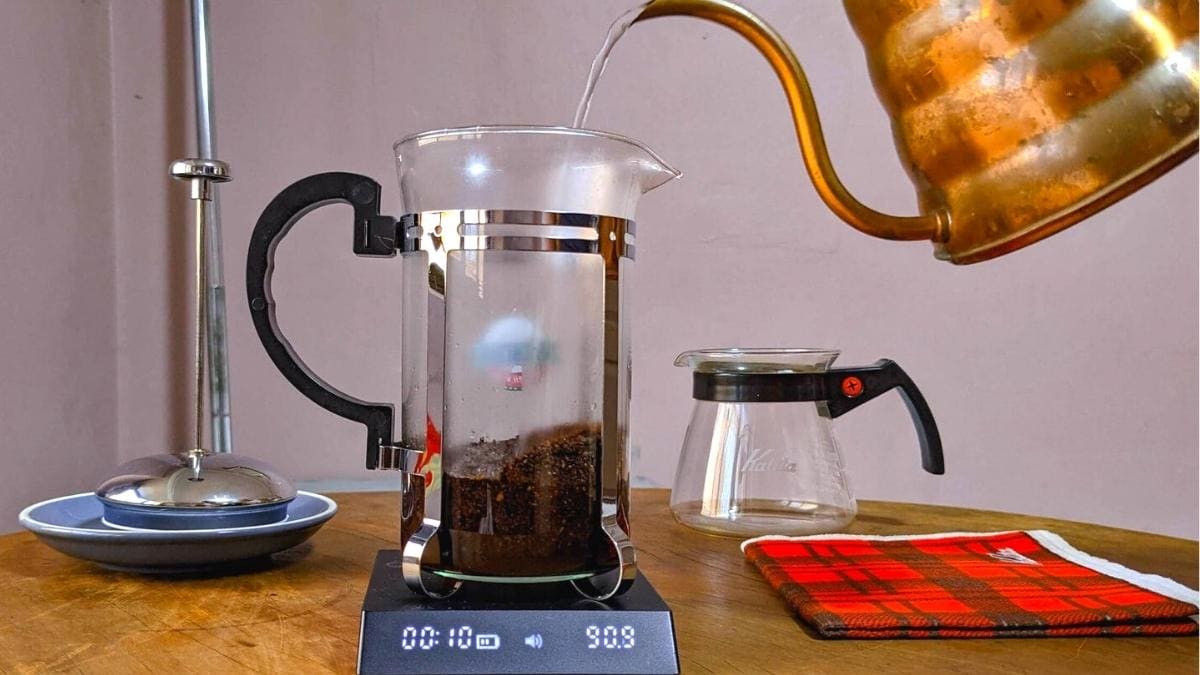
Add the coarsely-ground coffee to your press and tare your scale. Then set the timer and begin pouring water into the coffee until your scale reads 360 grams — or until the kettle is empty if you pre-measured the water. Try to saturate all the exposed coffee grounds with water as you pour.

Stir the Grounds
Stir with a spoon after pouring all the water indicated in your recipe. A wooden chopstick works if you prefer not to use metal! This step ensures that all the grounds are properly soaked. Be gentle when stirring — we don’t want to agitate the coffee too much.
The key thing here is to stir with a restrained style that you can repeat each time.

Dear eagle-eyed readers: We didn’t overshoot our 360-gram target by that much! Our stirring just registered some weight in the photo.
To Bloom or Not To Bloom
Blooming is a small initial pour of hot water on the coffee grounds followed by a pause in the brew. The escape of carbon dioxide causes the saturated coffee mass to puff up like a cupcake, opening up larger spaces between the grinds.

Pour-overs are better with the coffee expanded like this, because the water travels evenly through the dripper, from top to bottom! But for French press, stirring gently is a quicker way to saturate the grounds, likewise encouraging carbon dioxide dissipation. No need to expand the coffee in a press because there’s nowhere for the water to go.
Am I saying a bloom doesn’t make a French press taste better? Not at all!
A slow, deliberate pour early in the brew ensures that all the coffee in the press is fully saturated, with no dry spots. If you don’t stir your brews, a proper bloom will make a better cup than one made with aimless pouring. So if it works for you, then bloom away!
Steep for Four (or more)
Let the coffee steep for at least four minutes with the lid off to help the degassing. If you think you’re not getting the most out of your beans, then you can try extending the brew time. There are recipes out there that go as long as ten minutes!

Time to Plunge
Carefully press down on the plunger at the four-minute mark (or whatever brew time you’ve decided). Do this as gently as possible to keep coffee grounds from migrating upward. No one likes a gritty brew!

Pour it Out
Pour all of the coffee into your server or two cups. Even the most gentle plunge will disturb the siltiest bits of the grounds, which is the main reason behind sludgy cups. So for best results, don’t wait.
Now you have an easy, dependable recipe. Happy pressing!

Final Thoughts
A French press is one of the easiest methods to pick up. And we hope to keep it that way, with just two things to remember.
First, use our coffee-to-water calculator to figure out a recipe that suits you. Then, make that coffee come to life with better measurement accuracy and our dead-simple French press brew guide. Low-fuss, full-flavored cups await you!
Happy Caffeinating!

